Monday 21 December 2009

The blessing that is OSD++ (OSDPlusPlus)


If you're limited to MDT or you're having a hard time getting SCCM to accept information\variables prior to OS Deployment, OSD++ might be exactly what you need!

OSD++ can run from a Task Sequence after you've added it's source directory to a package, by including different XML files you can request information from the user and apply any changes to the registry or to the unattended file itself.

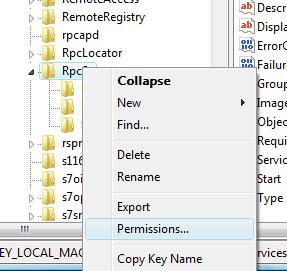
It can read from and to the registry as well as give you easy access to WMI information.

OSD++ offers a quick and easy way to get the computername or install software based on the spesific choices made by the user.
The users can either fill in a textbox, with or without Regular Expressions to control that the input is valid, or with listboxes.

The choices can be stored in a XML for future use, in the registry or in the unattended file the computer is about to use for OS Deployment.

All it really lacks is LDAP support though you can "cheat" your way to this by using Distributed Files Service and a "IF EXSIST" Batch script.

Try it by downloading it here (Documentation)
Read more at the OSD++ Blog


Graded: A-
Only needs a few more features to make it a Must-Have-Software for anyone without SCCM and most with.

Edit: New grade based on new experiences

Saturday 19 December 2009

Christmas Joy, Modena style!


It's been ages since I posted, but I come bearing good news!
While I was gone, Microsoft has released another RC of Modena, the soon to be essential tool in every Operating System Deploying SCCM Administrator out there.

So what's Modena?
Well in short it's an awesome extension of SCCM.
A better way to describe it is to say that it allows for administrators to design OS deployment, to add menus for optional application installations, exclude or require application installation, and much more based on a wide range of variables.

This will allow you and me to create a simple user interface for the end-user, allowing them to refresh or upgrade their OS to Windows 7 while ensuring that the hardware software gets installed and that the users apps and documents are present at first login.

What makes it really great is the ability to perform cancelations, with grace non-the-less!
Just check out the list of features for RC2 posted over at Technet

  • Enhanced Application support including Dependency, Exclusion, Locking, Filtering, and Topological Sorting
  • Application Discovery Pre-Flight
AppDiscovery runs as a pre-flight check in the OSD Setup Wizard and scans the local system for ConfigMgr software packages or MSI product IDs, and upon detection, marks them for re-install. AppDiscovery also honors any of the dependency and exclusion rules by ensuring that conflicting values do not break the wizard. AppDiscovery even supports deprecated software detection logic to allow “upgrades” to the latest version.
  • Powerful WMI Query Language (WQL) Support
Beyond application re-configuration, AppDiscovery also supports custom WMI query definitions to support almost end-less possibilities for administrators. Why support this functionality?
There are several scenarios where application delivery is dependent on hardware specific values, such as Manufacturer and Model Types.
Using WQL queries, an administrator can easily determine the Make & Model and set application delivery specifically for that model. In short, driver payload(s), OEM specific applications are deliverable only if the WQL query returns true otherwise the applications are not delivered.
  • Friendly, easy-to-understand, Results of OSD Imaging
  • Welcoming the Modena OSD Designer
The OSD Designer allows you, as an OSD administrator, to do the following:

  • Allows you to create new or update existing OSD Setup Wizard configuration files
  • Save configuration files locally or publish to the Modena Online Service
  • Enable or disable any OSD Setup Wizard pages
  • Enable or disable any page configuration fields (e.g. computer name, etc.)
  • Connect to Active Directory and setup Domains and Organizational Units in OSD Setup Wizard configuration files
  • Connect to System Center Configuration Site Servers and retrieve packages enabled for OSD
  • Attach x86 and x64 applications and configure dependencies, exclusions, and set application packages as required
  • Configure Application Discovery matching criteria for ConfigMgr packages and MSI product Ids
The OSD Designer is any OSD administrators 2nd favorite tool behind Configuration Manager console. It greatly simplifies your preparation for delivering operating system images using OSD.

  • Modena (Configuration for Wizard & AppDiscovery) Online Services
When new applications are released that update OSD apps, you have to manage this in the configuration for Application Discovery’s configuration to detect the updated version, package identification, or program name and do so a per-package level. This requires updates are done and then refreshed on all the DPs in your hierarchy with the package and this is cumbersome and prone to error.
  • Simplified Cancellation Functionality

The OSD task sequence and Wizard are now updated to support graceful cancellation. This improved functionality simplifies reporting and ensures the preferred user experience for end-users when they are not willing to continue the wizard. The difference between a failed task sequence (unknown root cause) is vastly different from an end-user who decides to cancel the wizard or doesn’t meet the requirements. This shuts the task sequence down gracefully and ensures to report the information accurately.
  • Quick and Easy Installation & Setup

Check out more here:


Friday 5 June 2009

KSOD - My lil fix.

Okay, so here are "more detailed" instructions on how I fixed the Black Screen Of Death (KSOD) problem.

Like I said, the error in our case came about because a Group Policy Object I made included security permissions for several services, among them the services:

  • Remote Procedure Call (RPC)
    And
  • Remote Procedure Call (RPC) Locator.
The default settings presented included the Administrator Group and the SYSTEM & INTERACTIVE accounts.
The account "NT AUTHORITY\NetworkService" was not included meaning that when the account later would try to read a setting (or do anything else) regarding the RpcSs service, it would fail and the resulting error made the Operating system reboot as defined in the recovery settings.

To solve this I PXE booted the computer into Windows PE available on our WDS Server and started RegEdit.
I incorrectly stated earlier that I didn't apply the change to the Hive but a review showed me that I had.
See this guide on how to load the %windir%/system32/config/SYSTEM hive and finding the HKEY_LOCAL_MACHINE\SYSTEM\Select\Current KEY.

This Key tells you what ControlSet Vista is currently using ("Current"), by Default and which ControlSet is "Last Known Good".
In my case the key for Current was 1, meaning HKEY_LOCAL_MACHINE\SYSTEM\ControlSet001\Services\RpcSs and the permissions applied to that container (or individual keys stored there) needed to be changed.

By right clicking on HKEY_LOCAL_MACHINE\SYSTEM\ControlSet001\Services\RpcSs and selecting "Permissions" I could grant NetworkService the READ right and before rebooting I made sure it was also applied with the help of inheritance.


Note: The first test was to grant the Account Full controll, which also worked but seems to be overkill.

  • Click on add
  • Click Advanced
  • Change Location to your Computer (if required)
  • Hit the find button and select the Network Service account.
  • Grant the account READ rights.
You might want to make sure the Enum and Parameters containers inherit the permissions as well.

After a Reboot, the Operating System should be able to boot as normal and the login window should show up after a short delay.

I hope this can help to shed some light on this problem for some of you, if it doesn't then feel free to drop me a line after checking out the other options presented below.
Last Revised:
17:47 - June 5th 2009

Black Screen Of Death (KSOD) - Mystery solved?

Black Screen Of Death (KSOD)
Mystery solved?

While applying some new Group Policies I managed to stumble into the mystery known as the "Black Screen Of Death" or KSOD.

In order to get SCCM to work I had to make sure certain services were up and running and in an attempt to prevent the user from accidently stopping the services I also applied security settings to the System Services settings in Computer configuration.

Before long, computers that had applied the new GPO and rebooted (due to updates) started showing up and no, they didn't walk to my office on their own =P
The error went undetected by Vista, it booted up but never managed to show the login and simply rebooted after showing the BIOS logo and before it showed the Microsoft Banner.
Only a Black screen and the cursor ....

Although 8\10 machines were saved using either "Last Known Good Configuration" or Restore points (older then 1 month), it didn't solve every case.
In a stubborn moment I decided to not simply re-install Vista when all attempts to restore failed, the main reason for this was because the solutions I found didn't apply to my problem but I was quite certain that the solution was not far away from what they had suggested.

I decided to do it the hard way and check that all of the settings were correct in the registryitself which of course involved looking at each setting as well as the security rights assigned to the key and containers.
I quickly saw that NetworkService was assigned as it was supposed to be in all of the registry
Controlsets and in the SYSTEM hive but in the RpcSs' security permissions, the NetworkService had no rights!

The reason for this was actually quite simple, the default security settings in the GPO did not include said user. (See picture below to see what users were applied by default)
I must admit that the discovery was uplifting and some what embarrassing at the same time.

With no rights assigned it had to be the reason for the KSODs we had seen, I Pixie (PXE) booted a Vista machine into PE and added the read rights straight to the controlset that was assigned as the Current one, held my breath and rebooted.


Of course, there might be other reasons in play but this is the solution that worked for me so it will probably work for some of you out there.

Default Assignment of Permissions to a Service.


This is how the GPO will assign permissions
by default, as you can see the required user
"Network Service" is not present and unless
it or a group it is a member of is assigned the
proper permissions, the system will crash.

Monday 30 March 2009

Instant help with Microsoft SharedView

Until recently I was unaware of Microsoft SharedView, I stumbled upon it while downloading from Microsoft a while back and I've used it more and more since.

Microsoft SharedView is part of the new generation of help desk and support tools from Microsoft and it allows users with a LIVE account to request assistance from anyone at any time.

It can be launched as a stand-alone application or inside many Microsoft applications like Office (Word) or LIVE Messenger.
Once it has been launched and the user has logged in, it's possible to request assistance.

Security is maintained on several levels, an incoming session is announced and most be accepted before it starts.
At first the "Service person" can only view the screen and an extra mouse cursor is added that is visible to both but only the person at the computer (Console) can use the his\her cursor to interact with the computer.

When whoever is connected clicks on the screen, a small "Spray" mark is made so that the user can see where to click, the service person can also request that their cursor is made part of the console and if accepted then they can also interact with the computer.

The major advantage with SharedView is that it offers a method for anyone to request assistance from their IT Department by making a few clicks.
The IT Personnel is then able to instantly view the screen via the SharedView session and show where they would like the user to click etc.

The major disadvantage is the lack of sound but this can be overcome by using Skype, MSN or a regular phone.

Another aspect is collaboration, when launched from Word, SharedView allows users to work together on a document either at different time or at the same time - in real time.
Time stamps and naming make it easier to identify changes and more.

All in all, SharedView is a clear indicator of Microsoft's dedication towards making great tools for support and help desk personnel and towards content collaboration.

You can download Microsoft SharedView here

Tuesday 24 March 2009

Win PE 2 boot from USB Key

Windows PE is a great tool for any IT Administrator.
Not only can it give you access to Windows Deployment or SCCM servers but it can boot up a computer that has crashed and allow for troubleshooting and file recovery and thats just the begining.

Win PE is usually executed and loaded over the network with the help of PXE ("Pixie") Boot but what if you for some reason can't get a PXE connection to your server?
Well in these cases you have two options, either use a DVD or USB Key to boot the machine and get the same level (if so desired) of access that you would if you were using PXE.

Since a USB is faster and better in every way, let's stick with that for now and please bear in mind that to complete these steps you will at the very least need to have a Windows Vista source (CD\DVD) on hand and WAIK installed.

Any Text like this:
"Type this command"
is meant to be typed.

Part 1:
Preparing USB Key for use

Start the Command Line, in Vista this needs to be done as an administrator.

XP: 
  • Press Windows button + R
  • "cmd"
Vista:
  • Press Windows button
  • "cmd"
  • Locate CMD icon at the top of the list and right click.
  • Chosse "Run as Administrator"
  • Confirm ACL (if any)
You now have the Command line (black and white console) open and you are ready to start Diskpart.
  • "diskpart"
  • "List Disk" 
  • Locate the number assosciated with your USB (for ex: 1)
  • "Sel disk 1" (Replace with your number) 

    (Make sure you do not select the wrong number or the next step might clean your hard drive and not the USB Key)

    WARNING: The next step destroys anything stored on the USB Key!


  • "Clean" 
  • "create par primary" 
  • "sel par 1" 
  • "act" 
  • "format fs=fat32" 
  • "Assign" 
  • "Exit" 
You can close the command line if you wish at this point.

Part 2:
Getting Win PE 2 on the key.

Okay! We've done the scary part, Easy huh? ;)
Unless you selected your computers HDD in the step above and cleaned it instead of your USB key, you should be ready for the next part.

So let's fire up the WinPE Console by going to 

Start->All Prog->Microsoft Windows AIK (WAIK) -> Windows PE Tools Command Prompt

What we are going to do now is to copy the files Win PE needs, this is a fairly automated thing but you need to tell it what kind of Architecture to use (X86 or 64) as well as where to place the files. (A folder that is not created is best)

So in the PE Tools console window type in the following but alter as needed:

  • "copycmd.cmd x86 c:\WinPEx86" 
    or
  • "copycmd.cmd amd64 c:\WinPEamd64" 
    or
  • "copycmd.cmd ia64 c:\WinPEia64" 
This will create the directory and copy the files as needed, you can add files to the C:\WinpeXX system when it is finished.

For example if you wish to add more tools (like imagex) then copy them into the \iso subdirectory
If you wish to tweak Win PE further then you can do this now before you copy the files over the USB key you prepared earlier.

Final Part:
Copy Windows PE 2 to USB Key.

The final command to issue now in the WinPE Console (command prompt) is the xcopy command that copies everything onto the USB Key that has the bootable partition on it.

This example presumes that:
  1. You copied into the c:\winpex86 folder
  2. That your USB is assigned the letter q:
  • "xcopy c:\winPEx86\iso\*.* /s /e /f q:\"
Now all you need to do is remove the USB and try it! 
By the way, you might need to change the BIOS settings so that your USB is placed above the hard drive in the boot order.